Tutorial #3b - Single Room Control
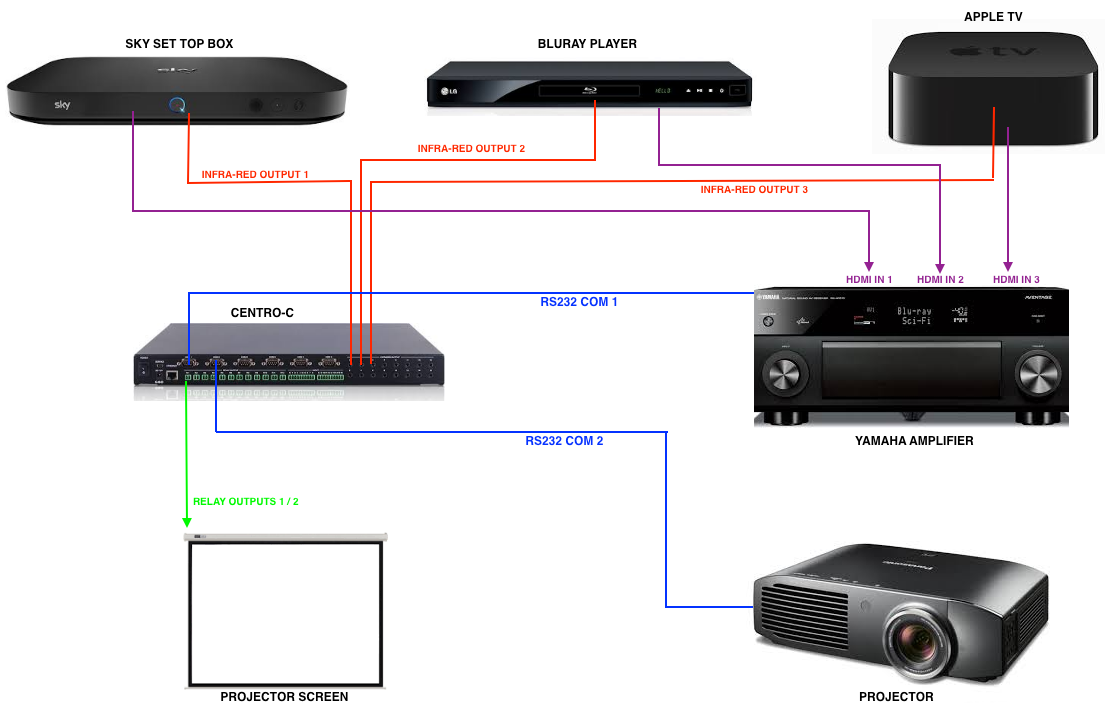
This tutorial follows on from Tutorial 3a - a complete single room 'home cinema' solution using 3 sources, an AV receiver / amplifier, projector, and motorised screen:
Download Base Project
Download and unzip the following project to a location on your computer, which is based on Tutorial 3a:
http://designer.docs.demopad.com/tutorials/tutorial3.zip
Then open that project in Designer - it should closely match the project you created earlier.
Adding Commands - IR
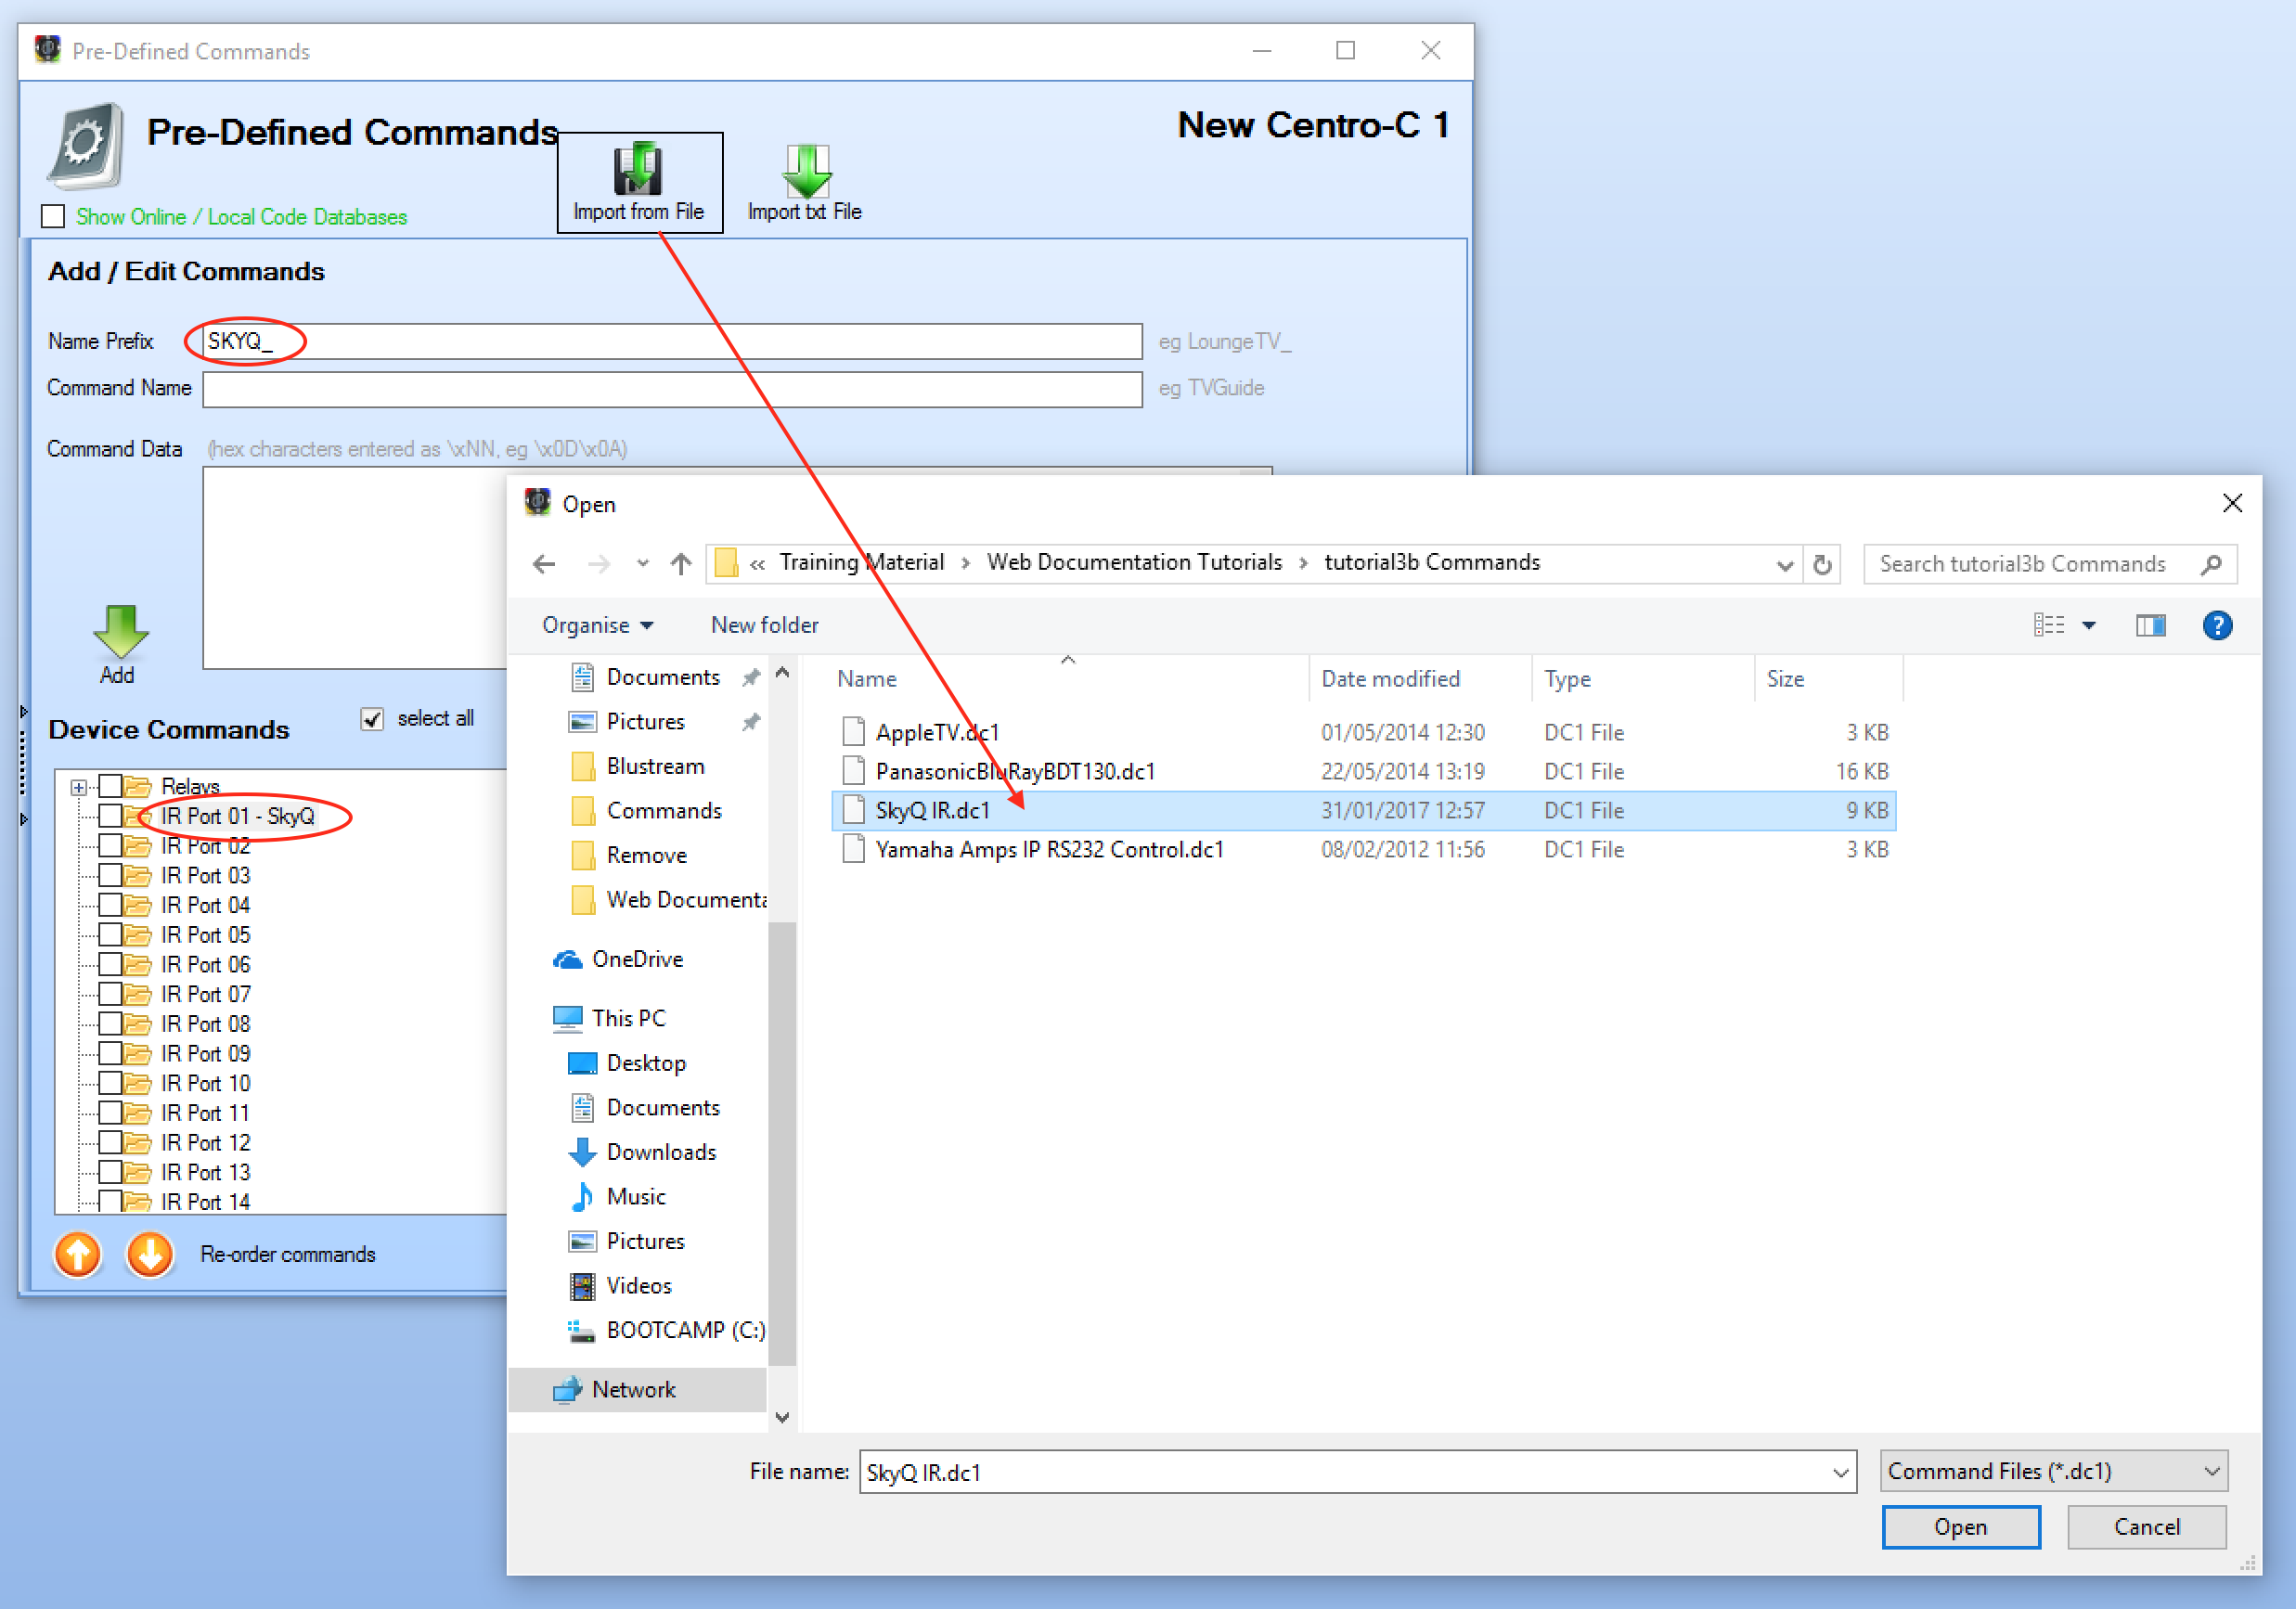
Select the Centro-C device in the project navigation tree, and select pre-defined commands. We will now add the command files, using the Import from File option for:
- Source 1 (SkyQ) - first single click the
IR Port 01folder, and add the text: ' SkyQ'. Then add aName Prefixof 'SKYQ_' for example, before selectingImport from Fileusing the SkyQ remote .dc1 file contained in the zip file, under the Commands folder:
- Next, do the same for Source 2 (Bluray) - using the Bluray command file, and Source 3 using the AppleTV command file, using
IR Port 02andIr Port 03respectively:
You should now have 3 folders, each named appropriately, with commands files in each to control the source equipment.
Adding RS232 COM commands
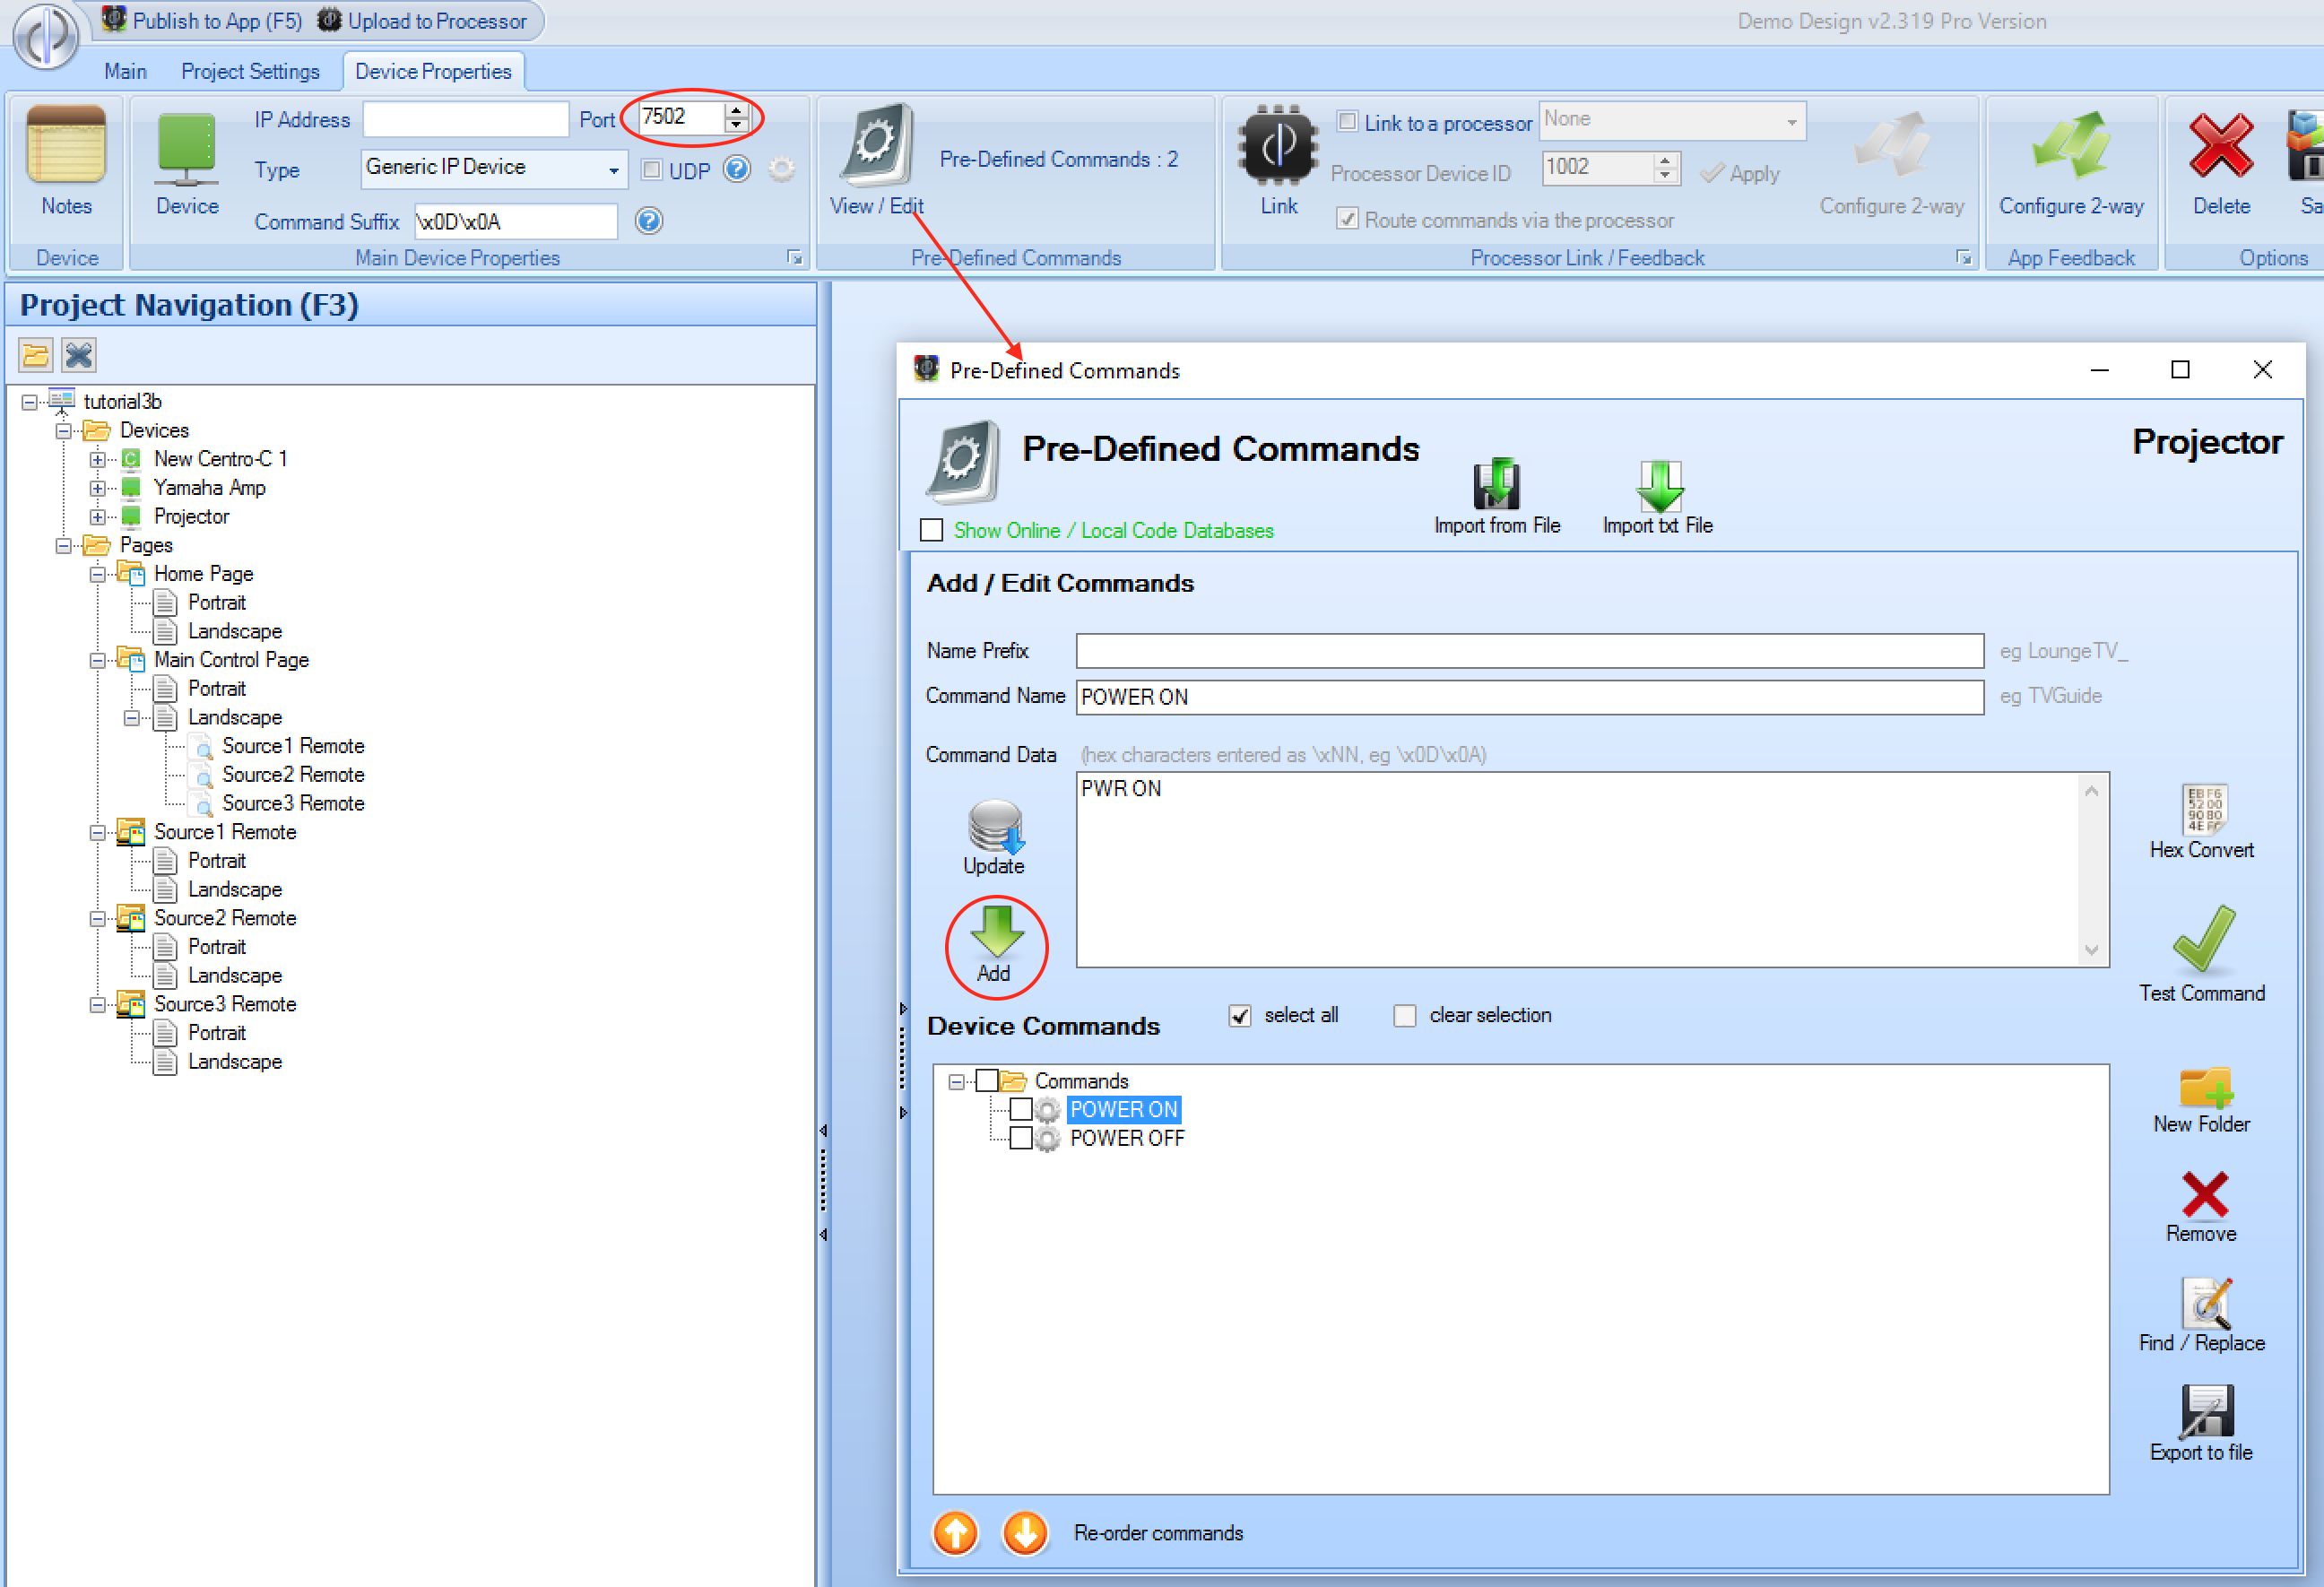
We also need to control a Yamaha amplifier via RS232, and a Projector via RS232, so we need to add 2 generic devices to the project, both with the same IP address as the Centro-C, but using ports 7501 and 7502 respectively.
Yamaha Amplifier - import the Yamaha commands into the pre-defined commands folder. As this device only has 1 set of commands, it is not strictly necessary to use the
Name Prefixoption, though you can if you wish.Projector - as there are only 2 commands we will be using for this tutorial, and as the command structure is trivial, you can manually add them -
PWR ONandPWR OFFare the RS232 commands to turn on and off an Epson projector:
We now have all the commands required for this project (the relay commands for the screen are added automatically when you add the Centro to the project)
Modify the User Interface - Building Block
Whilst the current user interface allows us to select and control the 3 sources, there are currently no options for turning the room on / off, or controlling the volume. To add these controls, we are going
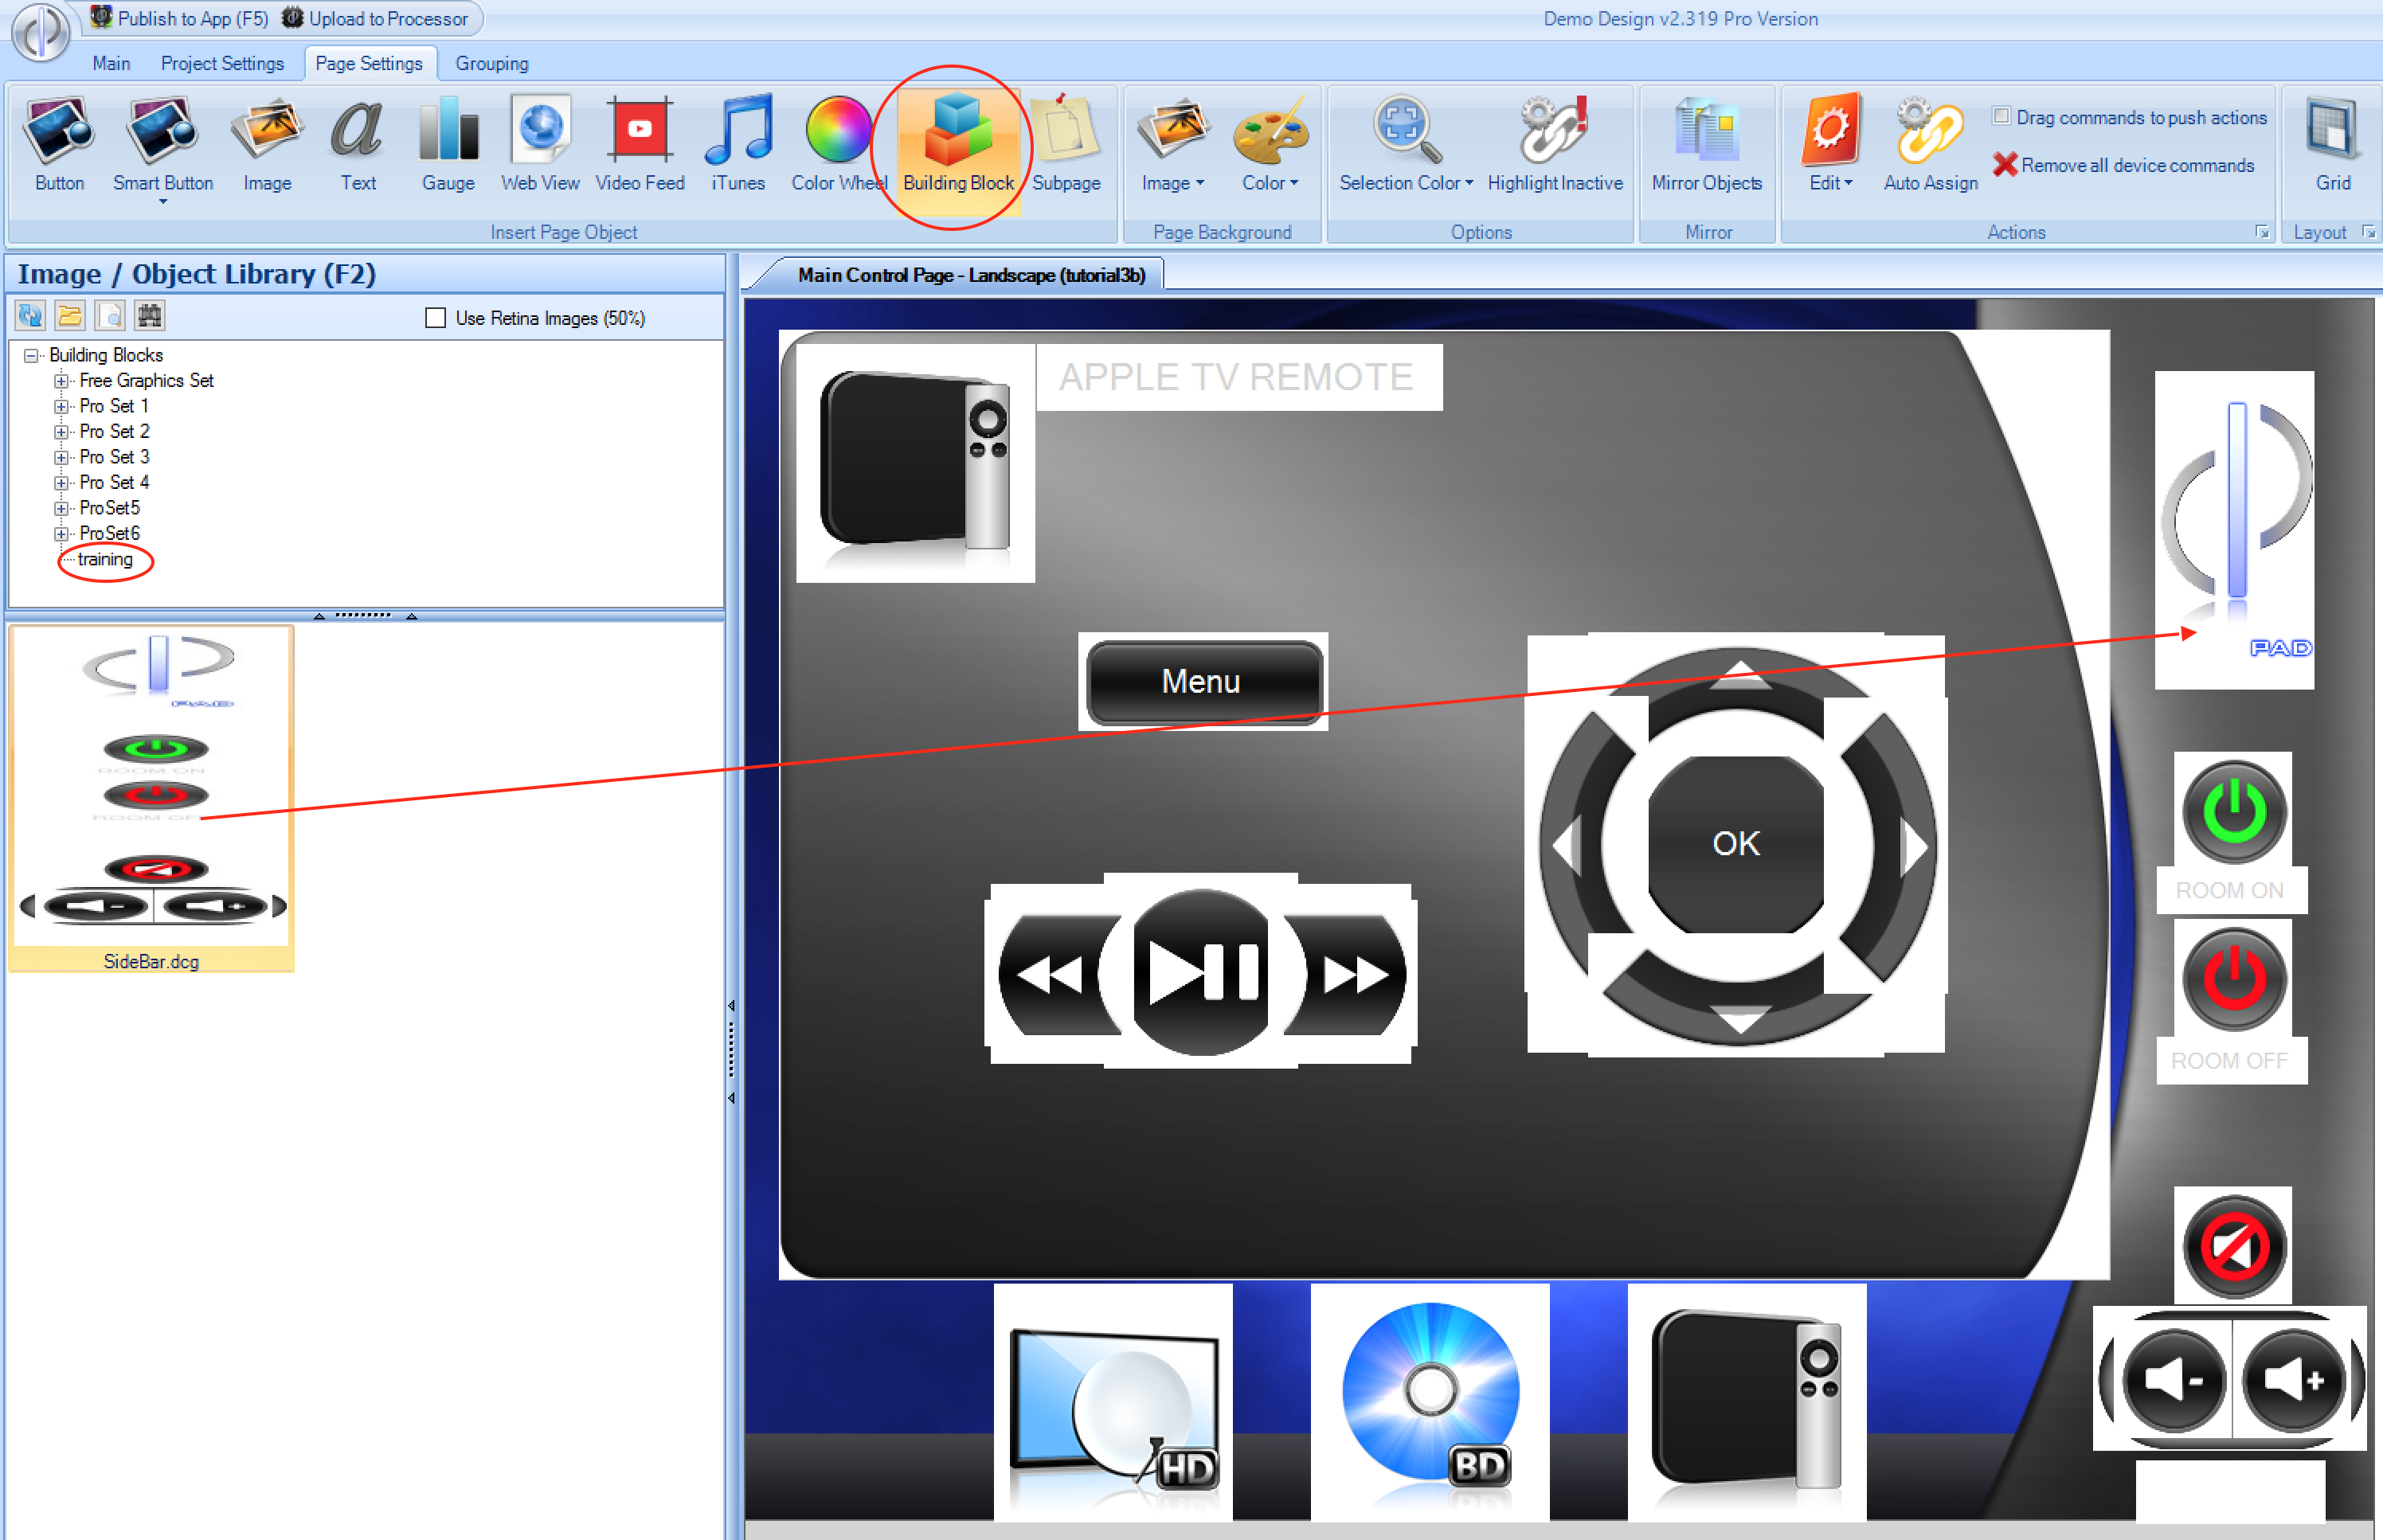
to use a pre-defined building block. When building blocks are saved, they use a .dcg file - and there is a file called SideBar.dcg contained within the building blocks directory of the tutorial3 zip file downloaded.
Copy this file using windows explorer into your DemoPad Resources\Building Blocks directory, which is located within the Public Documents folder on your computer. You may wish to create a new folder there, called training in which
to place this building block file, as shown below.
Then, add a building block to the main control page, as shown:
We now have all the necessary user interface elements for the project.
Assigning Commands
We now need to assign all the commands to the user interface buttons:
Room On / Off buttons:
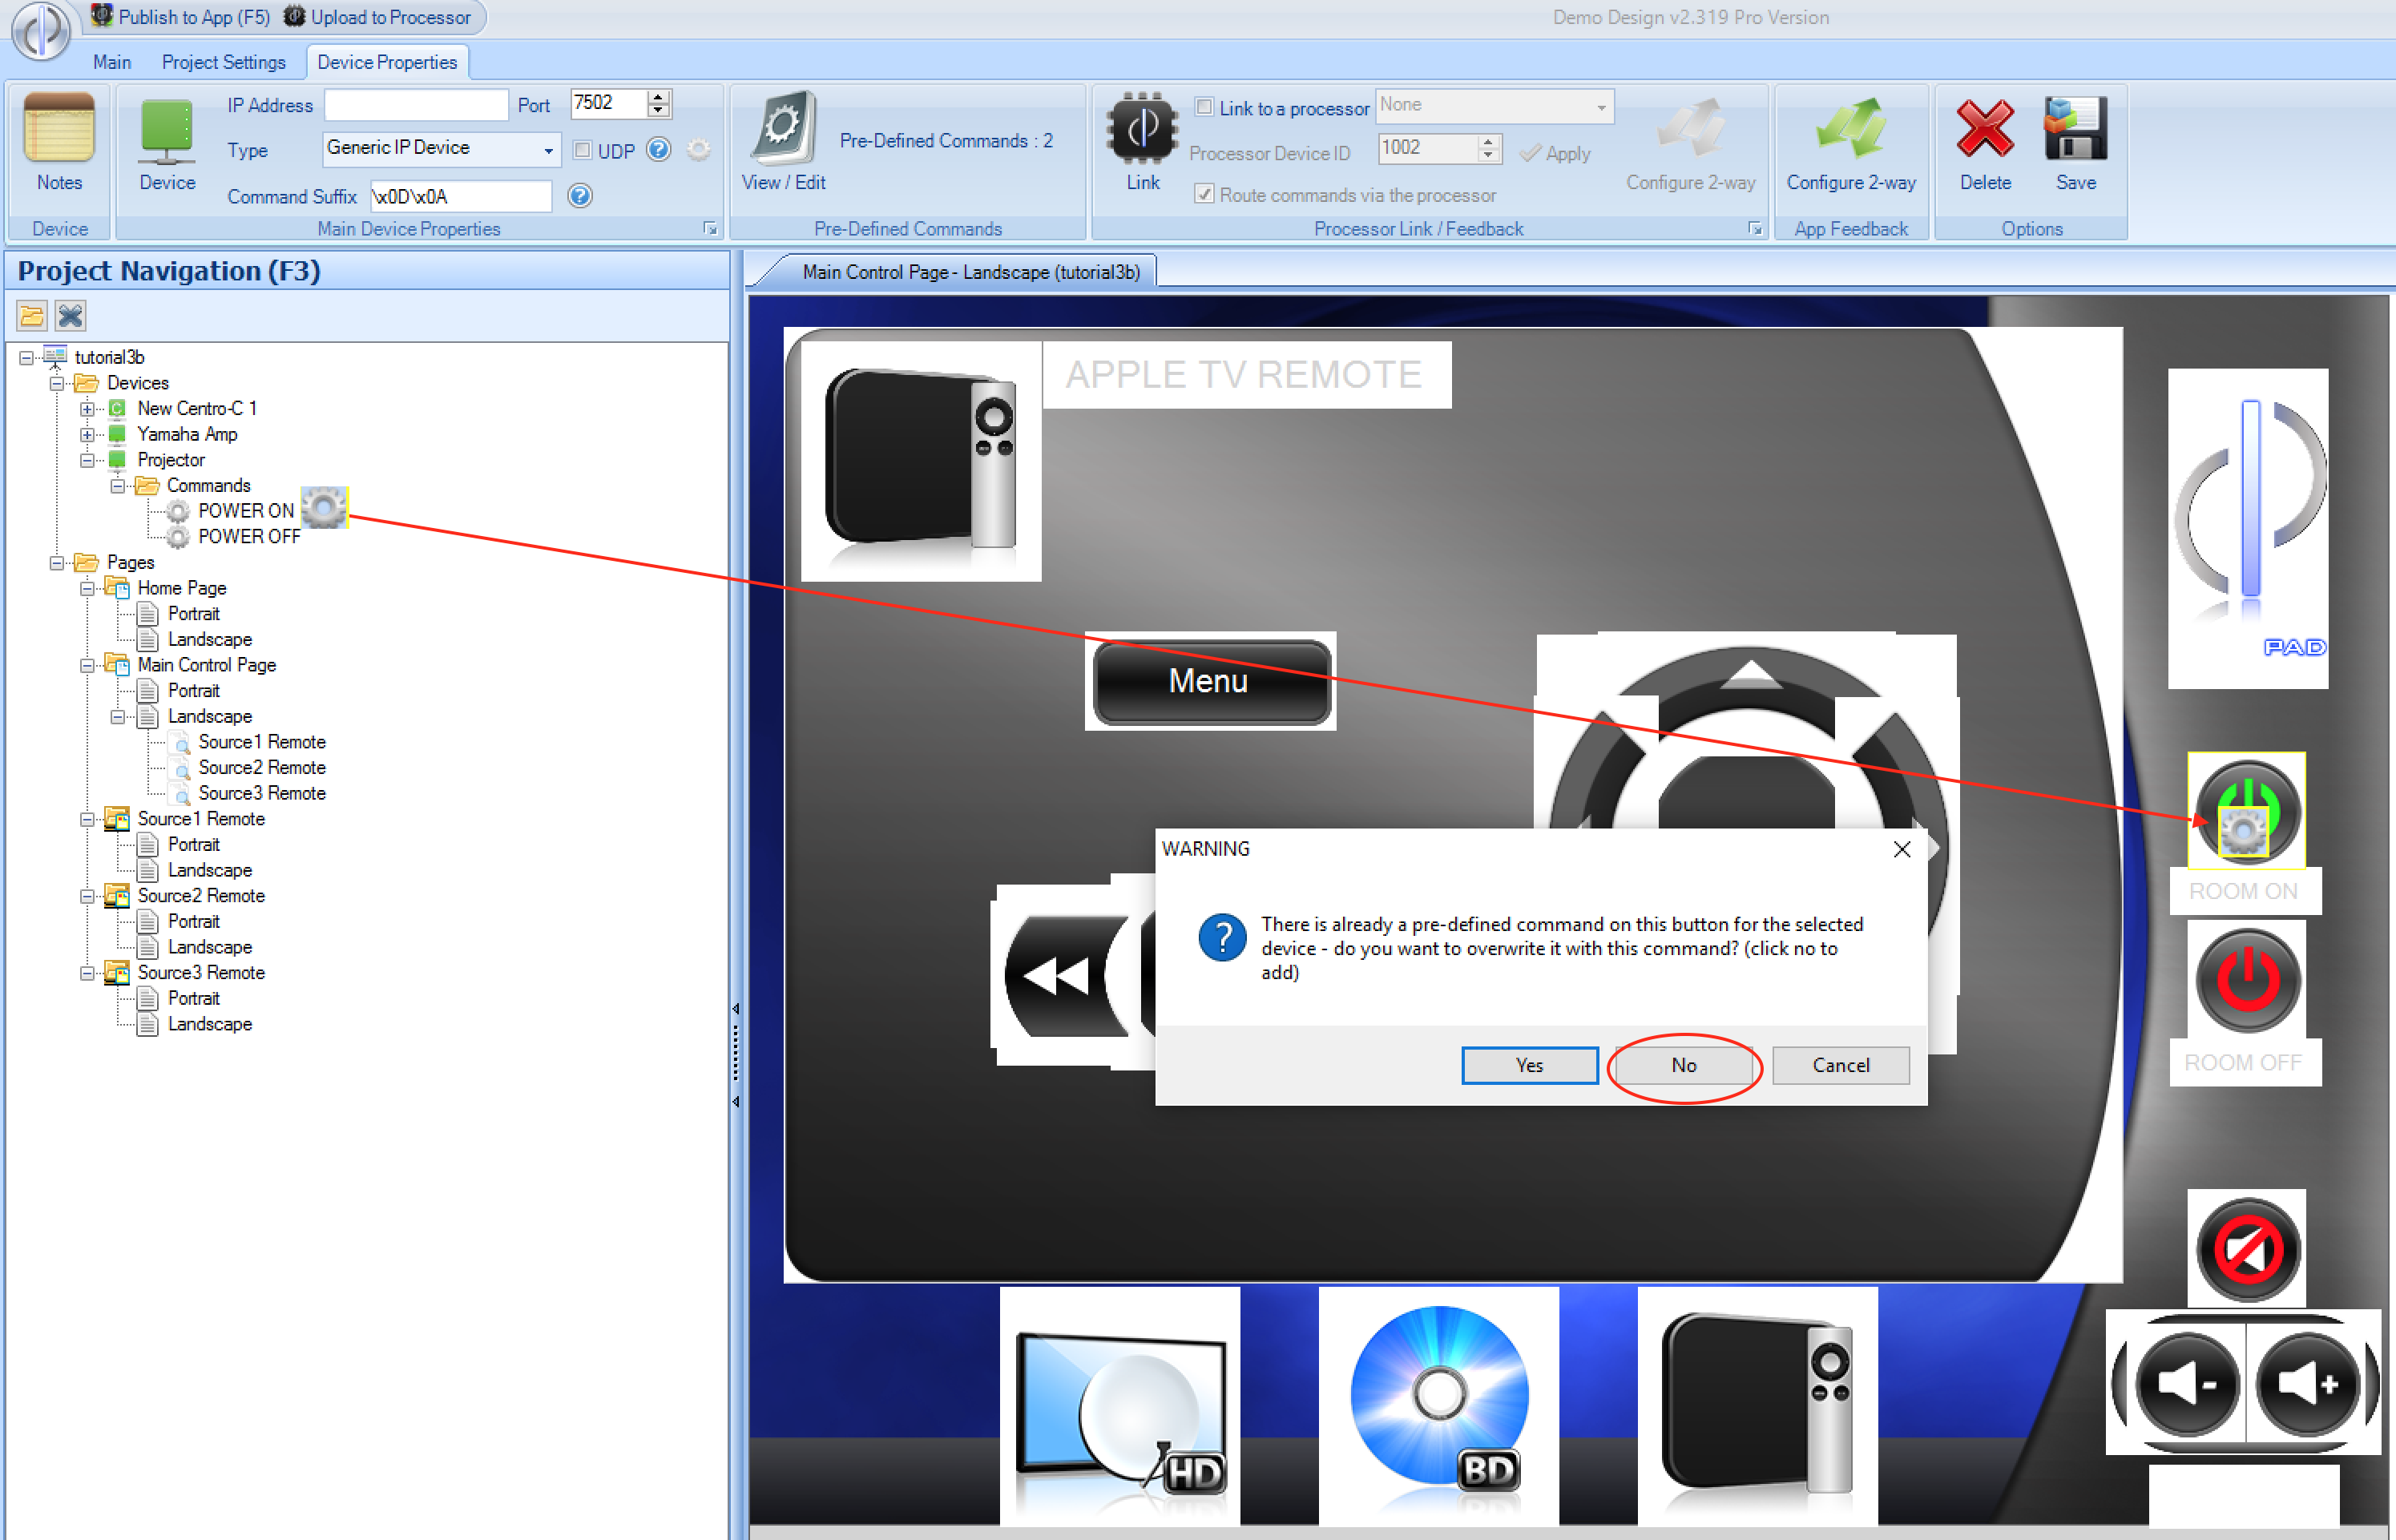
For the Room On button, we want to drop the motorised screen, and turn on the Yamaha and Projector devices. Add the following commands, by dragging the command icon from the tree view:
- Projector - POWER ON
- Yamaha Amp - ON
When you drag the second command, you will be asked whether to overwrite or add the command - as we wish to send both commands, choose No
We also want to lower the projector screen, which is achieved using a relay output, pulsed for 1 second (which is typical of relay interfaces to motorised screens). Double click the room on button, and add the relay close command, followed by the relay open command with a delay of 1 second:
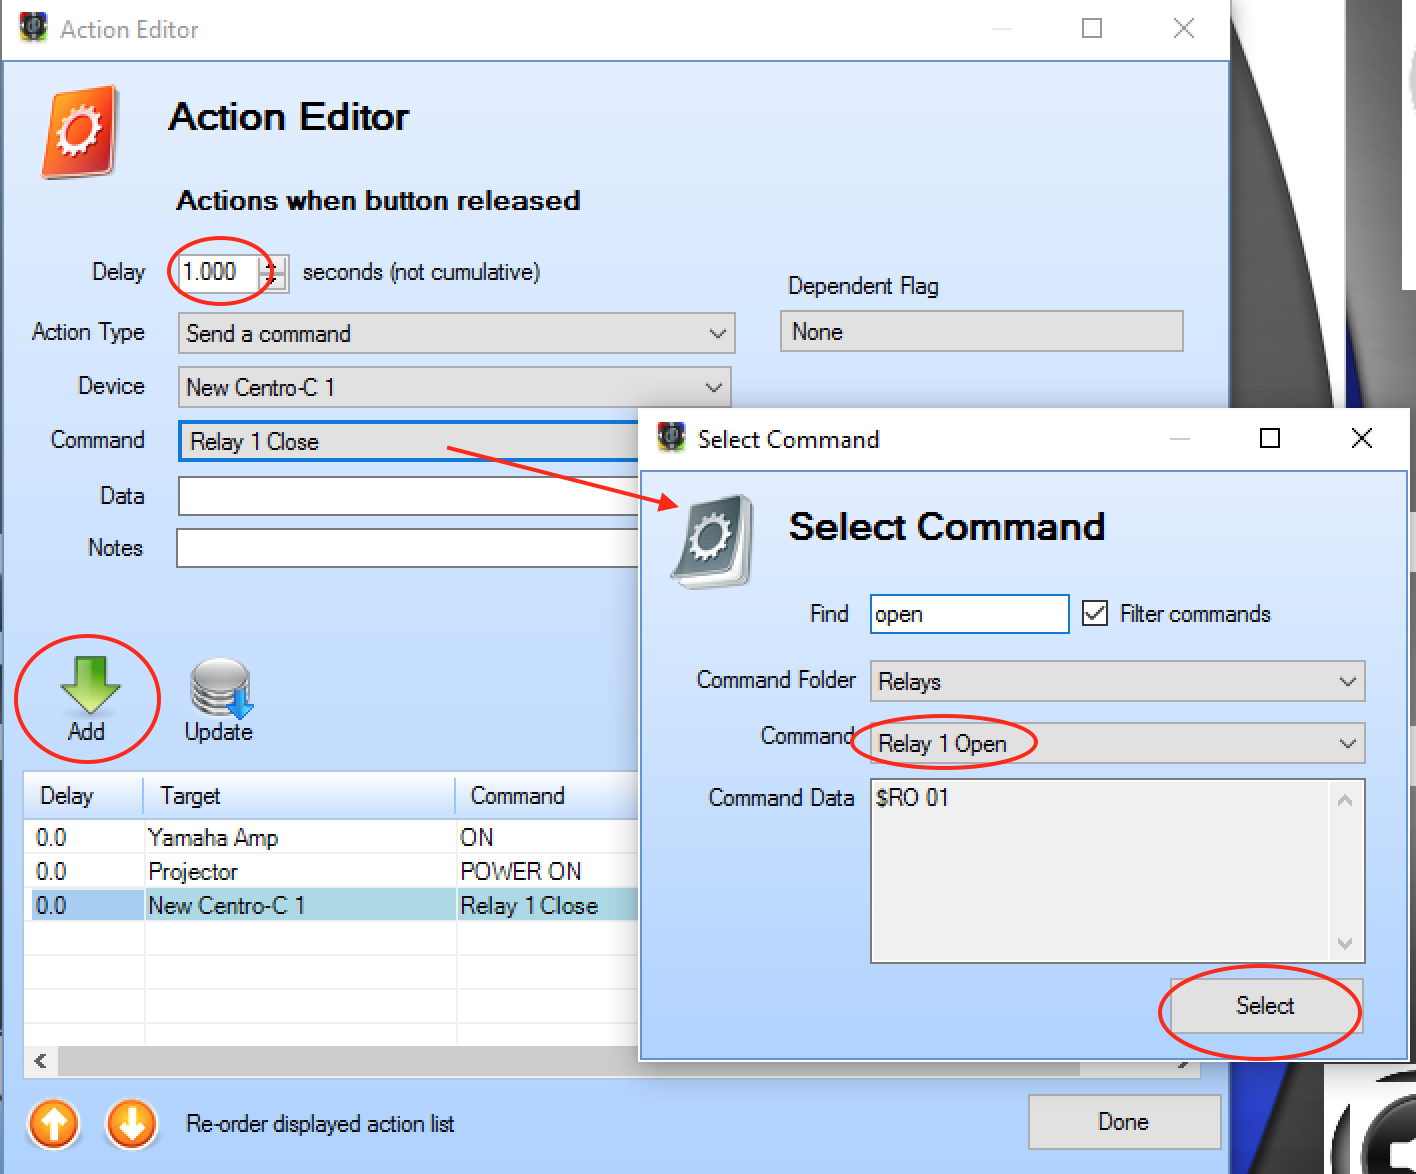
Your button should now have 4 commands, the first 3 with a delay of 0 seconds, and the relay open command with a delay of 1 second.
Now repeat the process for the Room Off button, using the power off commands, and using Relay 2 to raise the screen.
Volume Control
There are 3 buttons in the lower right for controlling the volume of the Yamaha amplifier:
Mute - simply drag the 'Mute' command from the Yamaha device to this button, as this is a standard button release action.
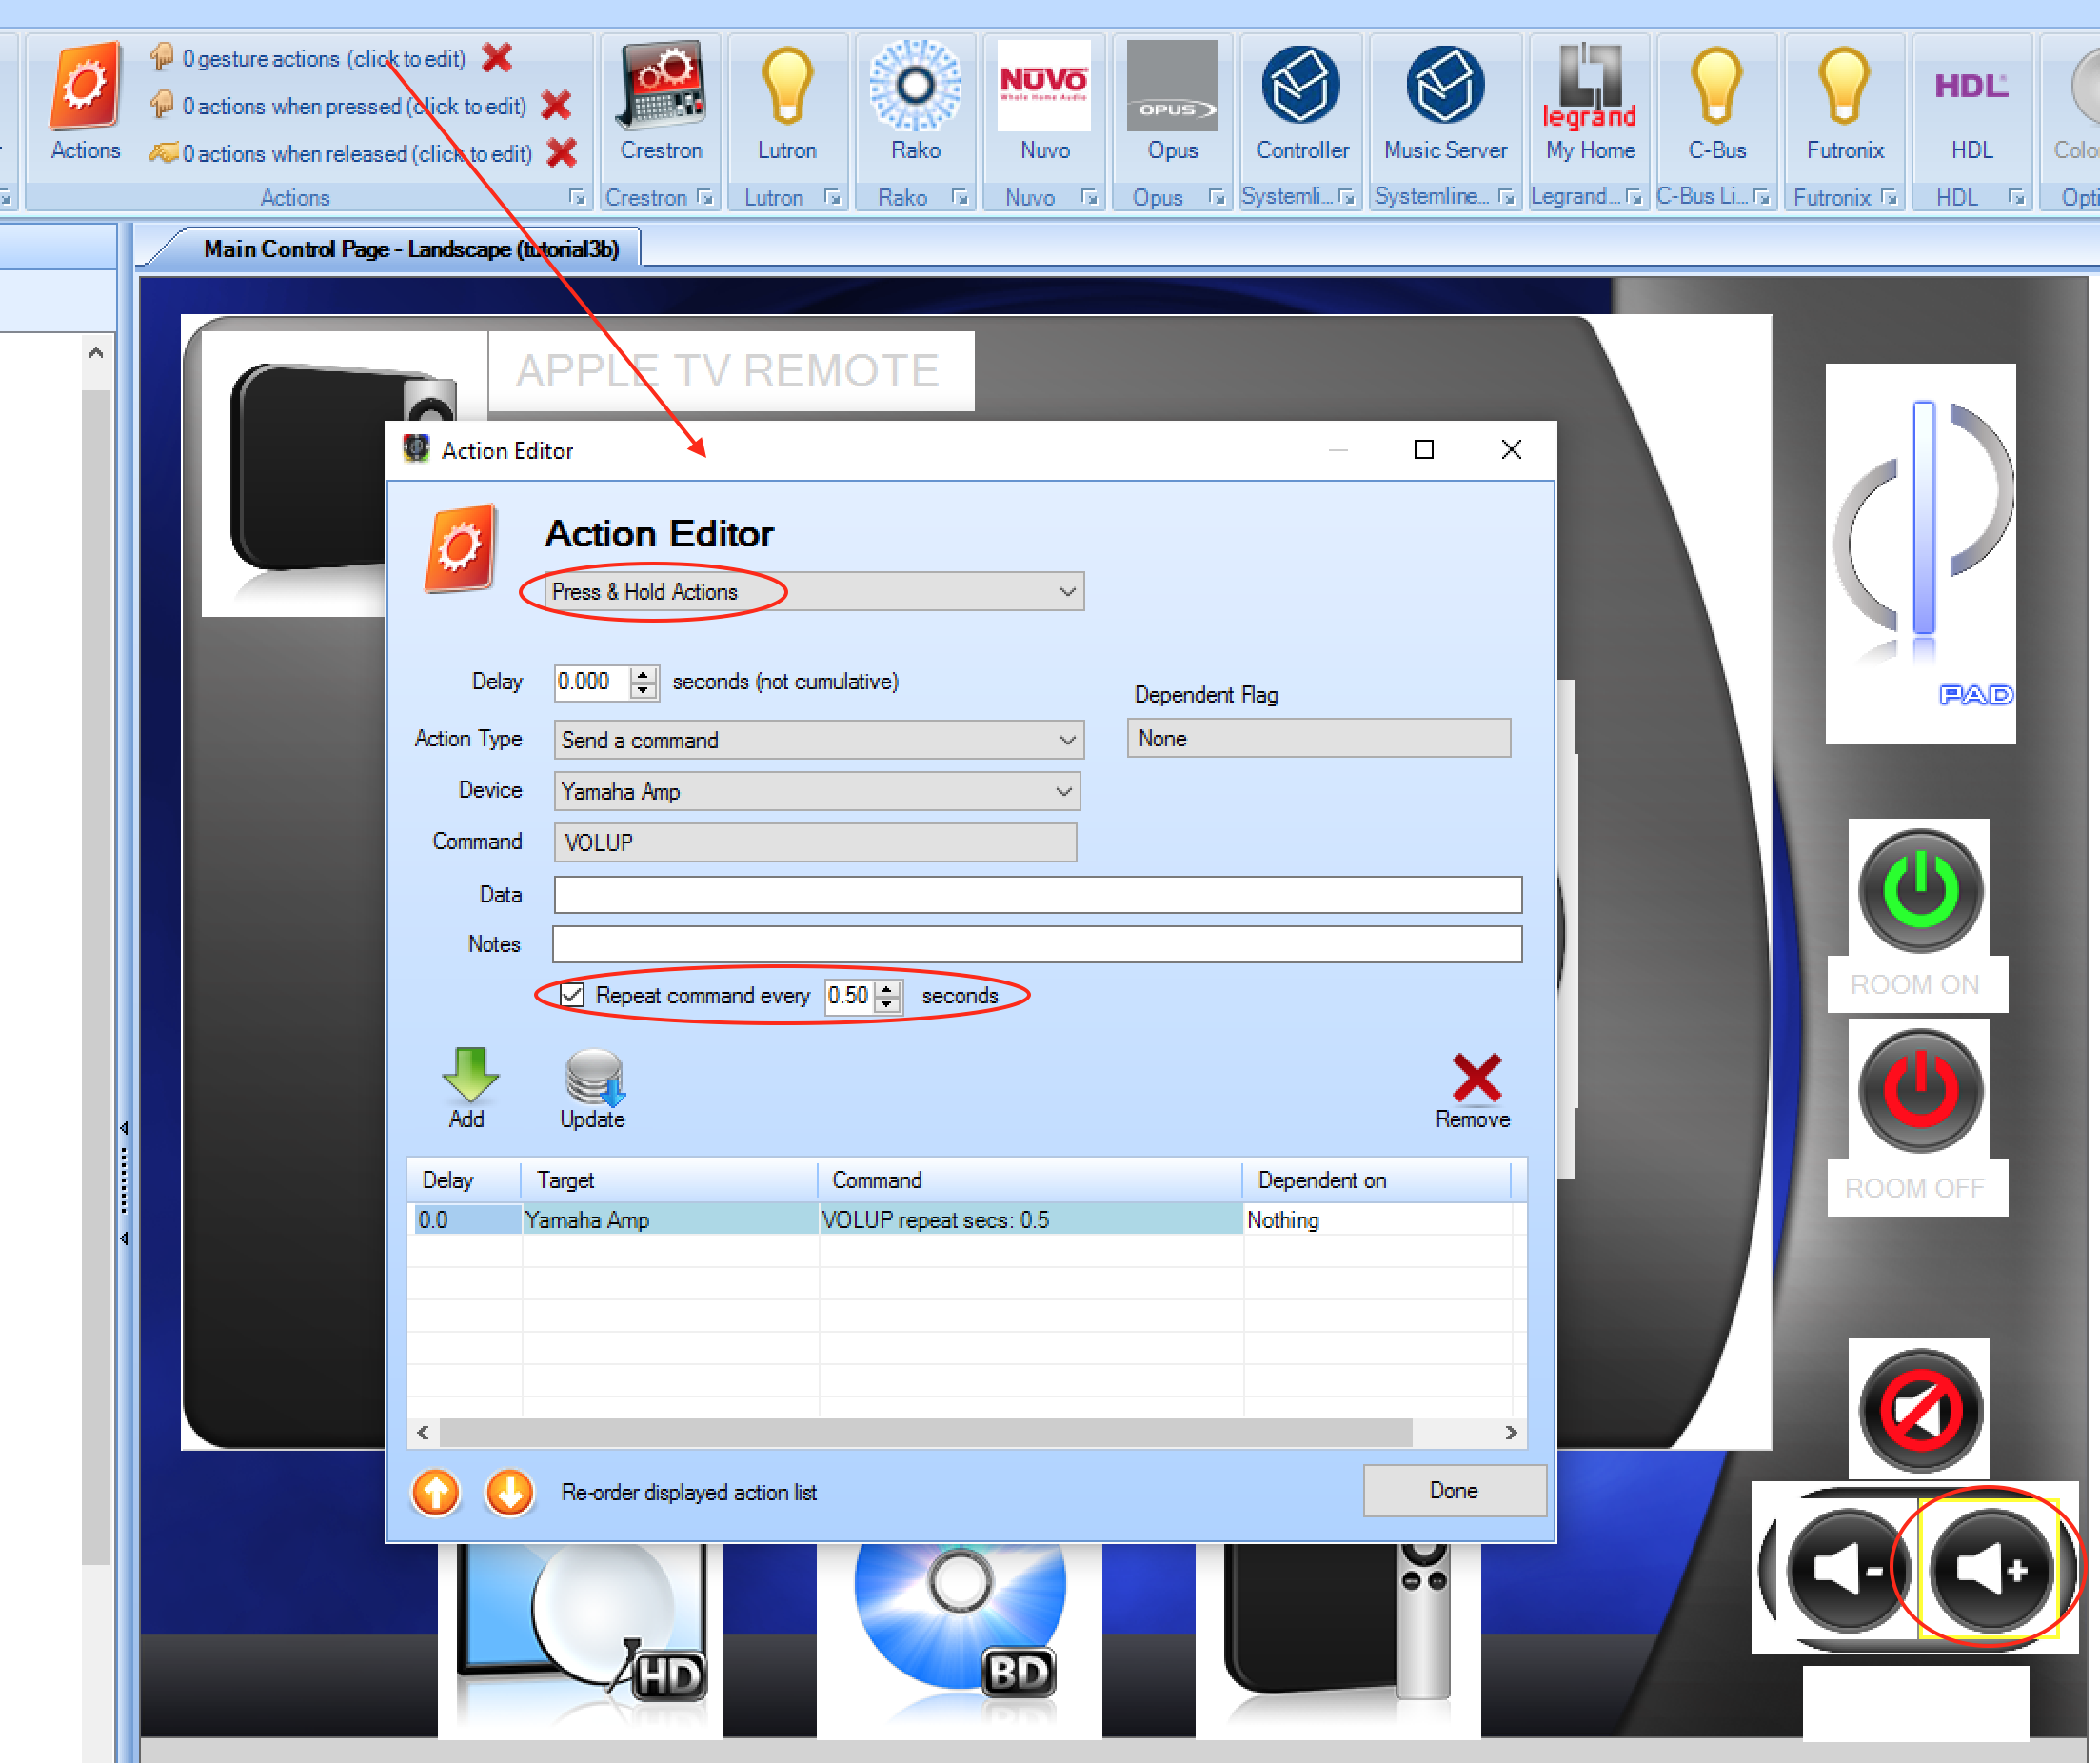
Volume Up / Down - for the up/down controls however, we do not simply want to drag the commands to the buttons, as this would result in the end user having to press the button many times to achieve the desired volume level. Instead, it is desirable for the end user to press and hold the button until the desired volume level is reached. This is done using a gesture action:
Press and Holdwith a repeat parameter:
Source Selection
For each of the 3 source selection buttons, when pressed, in addition to setting the flags to make the buttons highlight & bring on the remote control subpage, we also want to send commands to the Yamaha to select the appropriate source - HDMI 1, HDMI 2, HDMI 3. Simply drag these commands on top of each source selection button to program them accordingly.
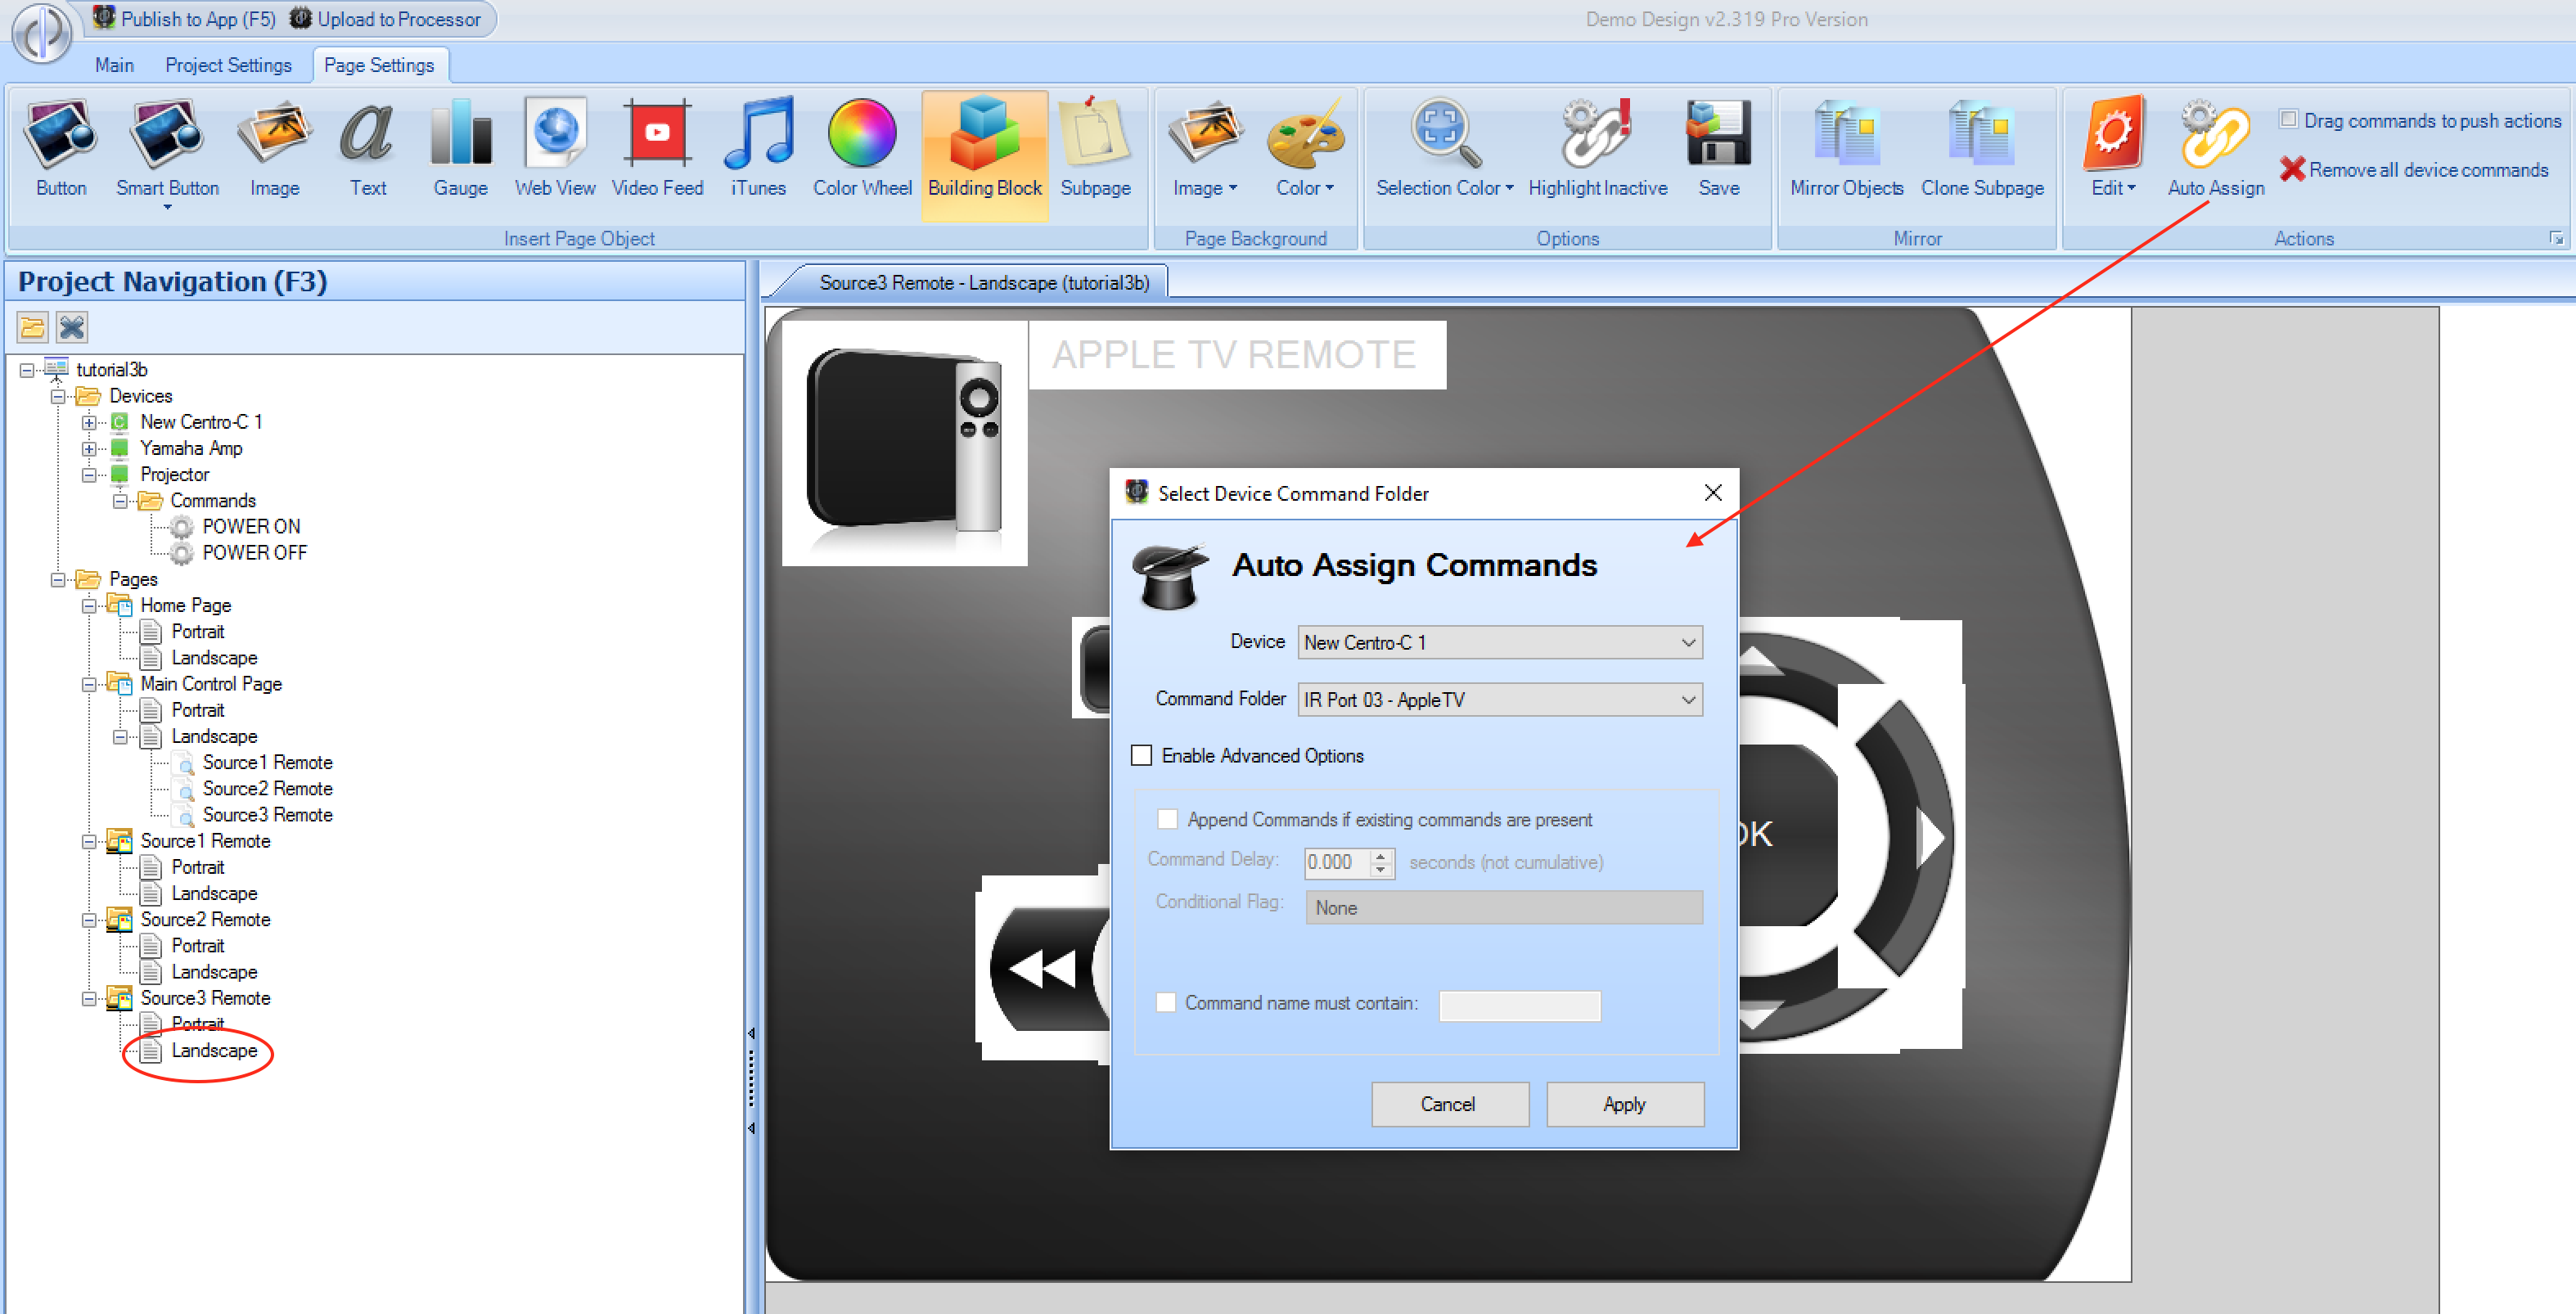
Auto-Assigning Commands
For source selection, and room on/off buttons, it is relatively quick to assign specific commands to them, however for remote controls with lots of buttons, it is far more efficient to use the Auto Assign feature.
- Starting with the Source 3 subpage - AppleTV, select the
Auto Assignoption from the page menu:
Repeat the process for Source 2 subpage - Bluray
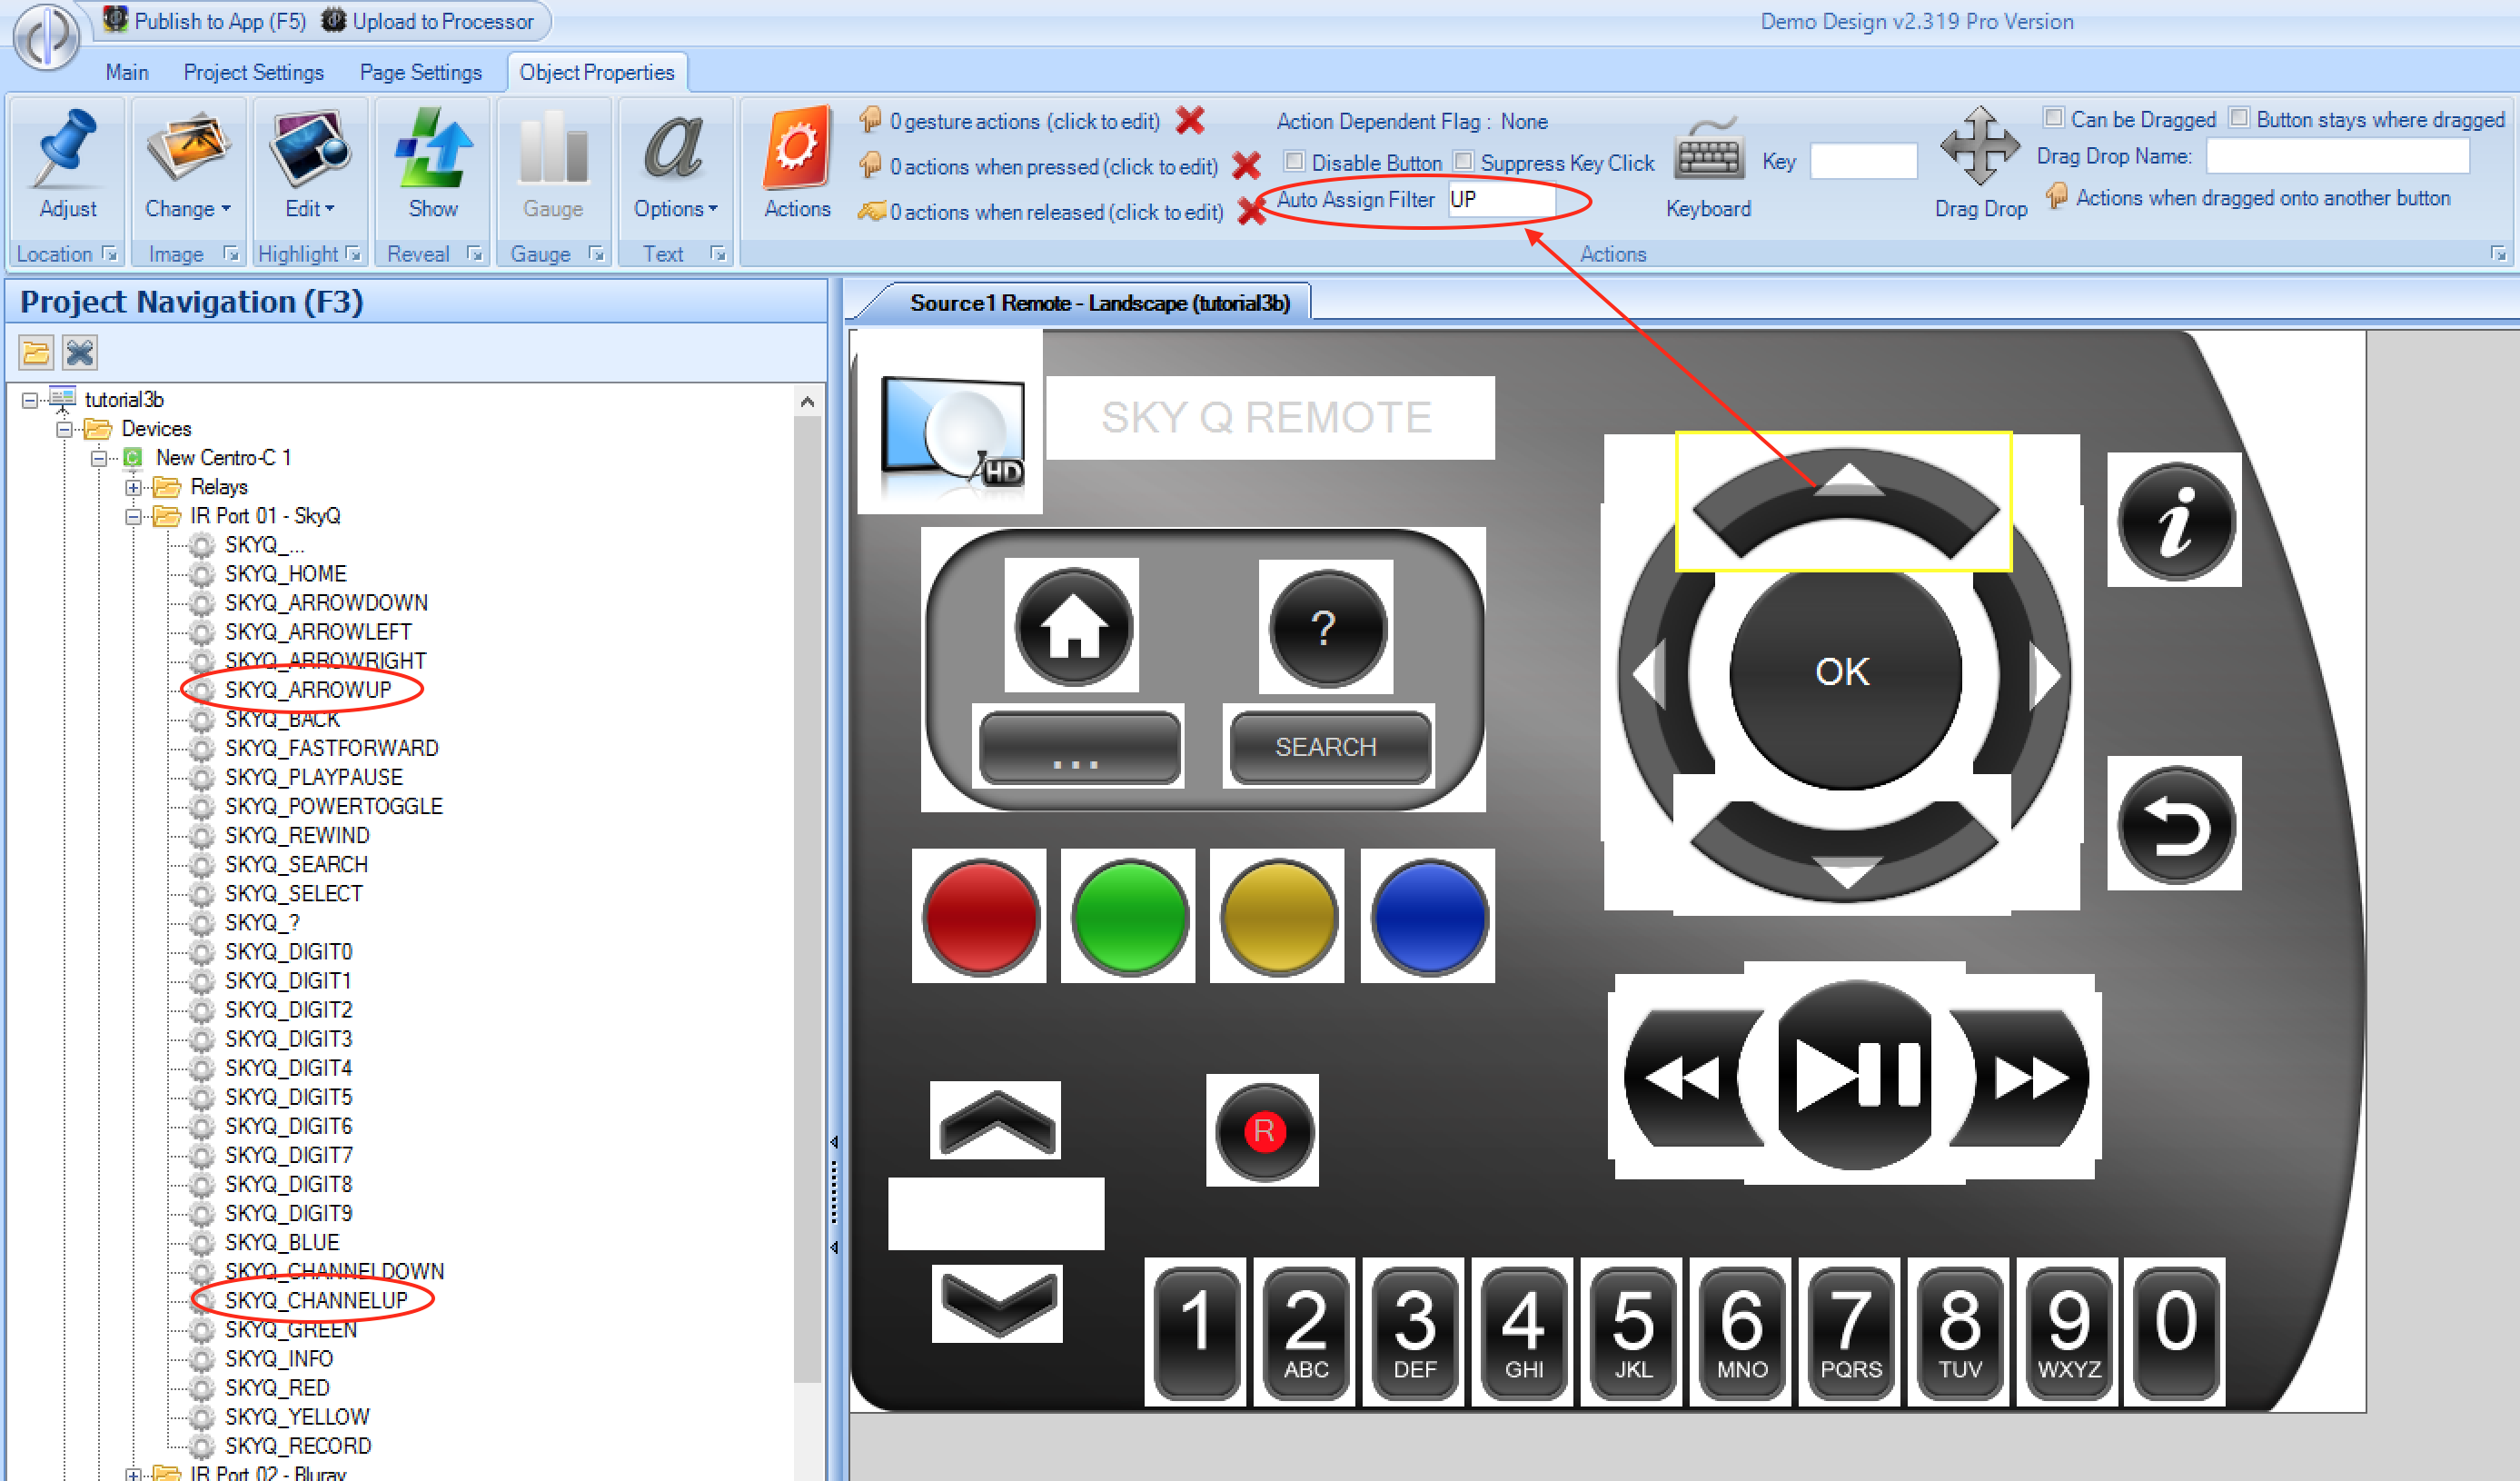
Finally, perform the same step for the Source 1 subpage - SkyQ. You will notice however, that not all the buttons have commands assigned to them - specifically, the up and down arrow buttons have not been assigned any commands.
The reason for this lies with the Auto Assign Filter that was used - in this case UP. When attempting to match commands to auto assign, 2 different commands were found with the text UP in them - ARROWUP and
CHANNELUP. Because of this, no command was assigned. You should alter the Auto Assign Filter to be more specific, ie ARROWUP - and the same for the arrow down button, and then attempt the Auto Assign function again
(note buttons with commands already assigned on the previous attempt will not be altered).
It is highly recommended that for all re-usable subpages, that you ensure that the command files you have match up with the Auto Assign Filter being used. That way, adding remote controls to future projects is
extremely efficient. In this case, all that is required is that the Auto Assign Filter for the up and down buttons is changed to ARROWUP and ARROWDOWN, and then the subpage could be saved for future use.
Project Complete!
If you wish, you can download the completed project from http://designer.docs.demopad.com/tutorials/tutorial3b.zip